Saturday, 15 March 2014

Griffon Auricom Mash-up


And for my next trick, ladies and gents...
The Pkf.85bis Griffon (by Hasegawa).. with a twist. 

Just started building this thing and I have to say, it is a dream to build. Everything fits so well you hardly need the instructions (if it doens't fit it's not supposed to go there).

The figure however... not so much. Weird how they both come in the same box.
The kit comes with two figures, but I'll only be using the pilot. The part hardly went together at all. So a lot of filling, filing and sanding was required.


The whole cockpit and figure needs to be done before you can put the two main parts together, so that's mostly what I've been working on so far.

The cockpit has some wires and boxes with buttons, but I thought it could do with a little more. Gave it a little air-conditioning and ran some tubes through the place to wire up some mystery boxes (one is the back of the targeting unit left over from my Super Jerry build)

Also gave the pilot and extra seatbelt and padded out his shoulders a little. In positioning his arms I wanted him to touch the controls so the ended up a little low. The padding disguises and compensates for it.
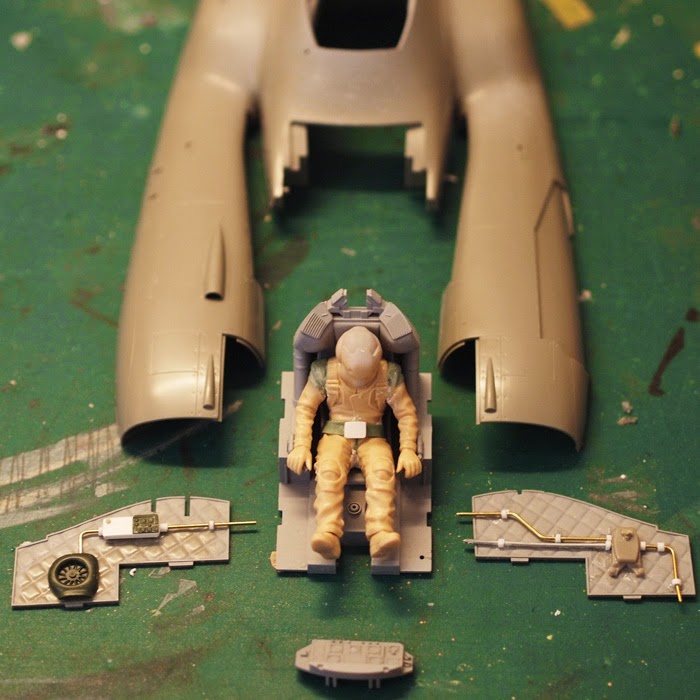


Of course, after dry fitting the cockpit in, I discovered that almost none of this will be visible when the build is done... This has happened to me before (on the Super Jerry), but I don't think I'll ever learn. I just get carried away haha.

Anyway, I put some primer on it.


Then I started layering some colour on it.
First a basic dark grayish layer. Then some Tamiya german grey on most parts and some colour on the knobs and buttons and the guys helmet...
The paint's not done yet obviously but this is where it's at.

I also decided, a bit late, to give him some gloves as I thought it weird he didn't have any. Most pilots would wear gloves.


Now you might be thinking "why in the hell would he paint that helmet bright red!?"
Well I'm planning to do something a little different with this one... It's only my 3rd Ma.K. build so something tells me to 'keep it real' and stick with the Ma.K. universe, but the idea I've got for this I can't really resist...

Maybe you are familiar with a video game that came out on the PS1, eons ago, called WhipeOut 2097. There have been a whole bunch in the series, but that one was by far my favorite. 
In it you race antigravity vehicles equipped with weapons (looking quite similar to this griffon) and you basically race and or shoot each other to (at the time) cool techno music.

I want to do this Griffon as if the game and the Ma.K. share a universe (maybe at different points in the timeline), and someone decides to paint an old Griffon he's found in the same scheme as his favorite WhipeOut team (namely Auricom, which was my favorite) and race it.
It could even be part of a back story for the game where "those guys started racing their Griffons back in the day and that developed into the great sport of WhipeOut we know today...."

Anyway sorry for this rambling. Here's a pic of the thing I going to base the colourscheme on. I'm hard at work figuring out a way to get that logo on the hull.


Sunday, 9 March 2014

Super Jerry finished


Well I guess this guy is done.

After the base paint and decals were done I put on two slurry washes. A technique explained to me (and in my opinion utterly perfected) by mister Klav at A1 Plastik. 

The technique is basically this:
Stir up a thick mix of oil paints and odorless turpenoid, the slop it all over the thing with a brush and let it sit for a little while. I let it sit for about 5 to 10 minute, but it kind of depends on the layer underneath it. I use acrylics for base paints with a clear coat over it. Let it sit a little longer on enamels (as per Klav's advice). 

Then use q-tips to remove all the excess paints. This takes time and resource (a ton of q-tips), but I like the process. I also used rolls and wads of tissue paper here and there.

The first wash on this guy was a mix of black and green. The second, a mix of burnt umber and black and a little bit of oxyde red.
The only pic I have of this process is one I took with me phone... and it's a little crappy. Sorry.


After this I added details like rust and some streaking etc. I will admit I kind of went overboard with the rust at this point. 
The thing started making the impression it had been out of commission for a while...

After this I gave it another wash of light sand/dust colour this kind of toned down the rustyness... but still. Anyway.

then all that was left was to put in/reveal the windows.... I painted the little window frame of the main canape. This of course didn't match the stained hull in no way what so ever. Sh*t. I tried to sort of add a little wash to it.. and I kind of got it somewhat closer. Not perfect though.

Then I peeled off the latex mask from the side window and I put a 'sand/dust wash' on the windows. I didn't want the window all shiny and bright with the rest of the machine looking all old and tired. This wasn't as succesfull as I had hoped but I guess it was close enough.

From the beginning I had planned on adding some pigments to this guy. Just because I had never used them before and I thought the rocket tubes could use a bit of soot and the legs and feet could do with some sandy dirtyness. The soot worked well enough, but I'm not too sure about the legs and feet. Maybe its needs more of I might scrape some off...
I used Vallejo pigments and that pigment application fluid they've got. Couldn't really get the hang of the stuff really. 

Through-out this build I tried a lot of new things (some modding, the slurry washes and pigments for instance) I can't say I'm perfectly happy with all of my experiments, but overall I think it turned out quite nice.

Oh and the pics are a little weirdly lit (direct, low sunlight with a tinfoil reflection screen) I still don't have a decent set up for that.


Sunday, 2 March 2014

Super Jerry, more paints...

I put the paints on. 
I settled on a paint scheme... not really happy with it, but I think I'll pull it together in washes and filters. The think I don't like is that I based the blue colour on WW2 germand tanks, but the white kind of makes it look more like a special units police vehicle, or military police or something... wasn't really going for that.

The contrast between the blue-grey and the white is too high and I don't like the big white nose. I should have gone with a more subtle use of white. Anyway as I said, washes and filters will save me, and I guess an MP unit is kind of cool too.

So anyway, after the red from the last post, I put on a coat of matt varnish. Then I put on several (transparent) layers of the blue-grey, the last one was a little lighter than the previous ones. Building up the colour. Then I put on the white. 

I then added chips and general wear of the top layer of paint using a knife, steel wool and a little copper wire brush from a soldering set.


After this I shot the whole thing with a coat of clear gloss varnish, readying it for decals. After that another quick coat of varnish to seal them in and it's ready for the dirt...

Thanks for looking!


Saturday, 22 February 2014

Super Jerry paint


With the build finished, the time has come to primer this monkey up (and do some more sanding after all the still gaping gaps, seams and putty blobs became painfully obvious again).


I'm still contemplating the colour-scheme but I couldnt wait to get started on the paint.
After some deliberation I decided to brush paint it. One because I just like act of brush painting more that AB and I also like the texturing it brings to the piece.

So first some shading (pre-shading?).
Kept the the paint really thin and layered it on in a few passes. I used a pix of Tamiya Black and Flat Brown.


After this dried I put on a couple of layers of a base colour. A mix of Flat Brown and Flat Red. 
This was the first of a couple of layers, again keeping them all thin and translucent.


Of course, being a clump fisted goon, I broke a part out of the back of the thing. So I replaced it with wire... something I should have done in the first place.


So now to decide on a paint scheme...
I'm thinking of a more traditional combination of either a light olive drab with yellow bands or a more khaki / sand colour with white accents (following the colour card in the box).
I want to put it in an urban environment later on, so maybe a more dark and light grey camo (orange bands) might work too.

Anyway, that's all for now. 

Cheers!


Sunday, 16 February 2014

Super Jerry further assembly

The build's done. As much it can be for now.
I left some panels off and most main parts aren't glued tight yet as I'm getting ready for paint.

There are already quite a few things I want to do very differently in my next build. Most notably the weld seams... they are waaaay to crude now. I'm just chalking it up to experience and learning. We'll see how they come out after paint and weathering, maybe they be won't as noticably crappy.


I rebuild the rocket launchers out of styrene, as I couldn't get them seamless and smooth looking (without just about sanding the entire rings off anyway). This was quite a learning experience in itself. First cutting the styrene tubing to size was a nightmare, before I found this neat little pipe cutter.

Getting the styrene strip glued onto the barrels was a bit of a b*ll ache too, but I learned that after I scraped the inside of the strip with a knife (making it curl and slightly thinner) and switching to a hotter glue (for the first 3 I used Tamiya Extra Thin, but switched to the hotter Plastruct glue), they went on ok.


I also added some extra nuts/bolts that I cut off the sprue, here and there. Most notably on the back cover, which I couldn't get to fit exactly. I didn't mind the bad fit as I liked the idea of this thing having been taken off and put on a few times, by the field mechanics, and to accentuate this idea I added the bolts there (some rust and chips will be added later too).

There were also some holes in the legs I didn't really like (in the hydraulics and in the gear-looking thing through which the screw goes to attach the leg...if you opted for that construction route) (I didn't). I put another bolt in the hole in the hydraulics part and just filled the hole in the gear looking thing with putty.


That's all for now. 
Next up; deciding on a paint scheme and method… undecided between, AB / HS or all brushes.

Thanks for looking!