Hope it helps and you can leave any questions in the comments.
So let's go!
Step 1. First off: the paints and the tools.
I always use Tamiya acrylics but it should be just about the same process with any other brand of acrylics. Not sure about lacquers to be honest...
Anyway these are the colours I'm using.
For the tools:
A number 00, number 0 and a number 1 brush and a toothpick or as in this case a wooden 'sate' skewer
Step 2. Base paint.
I use Tamiya grey base paint, no specific reason I always use a base coat. It makes the paints stick better and the grey is nice and neutral.
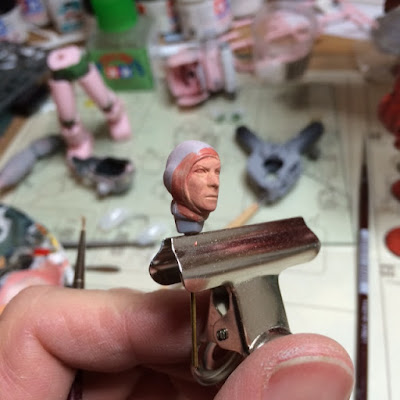
Step 3. With the number 1 brush I put on a base colour of a mix of red, orange and pink. It should be a reddish orange and it functions as, well as a base.
Step 4. Layering
On the base coat I start layering thin coats of the skin tones using the number 0 brush.
Which is basically the Tamiya Flesh tone mixed with the tiny amounts of Flat Red for the redder parts (like the nose, cheeks and around the eyes) and mix in a tiny bit of Medium Grey for the jaw and upper lip to suggest beard stubble. Keep it subtle!
I thin the paints with water. This is a little tricky and might take some trial and error to get right, but I want the paint thin enough to be transparent but it shouldn't be too runny or it will run in all the creases and ruin the detail of the mold... remember if it all goes to shit, just dip the thing in thinner and start over.
Step 5. The white of his eyes!
I think this is the most common way to do eyes at this scale. The trick is basically to put the white on kind of sloppy. Not to worry about going outside the lines and then cleaning it up later.
Step 6. The pupils.
For this I use the toothpick. I've seen guy elsewhere on the interwebs use a brush for this and I've tried... but I just can't do it.
I first put in a dot of brown and then a dot of flat black on top of that. It's just to get a suggestion of some colour happening in there as the scale is too small for actual irises and pupils.
When using the toothpick make sure there's no droplet on the end of it. The wood should be absorbent enough (if that's the right word) to hold enough paint after you take off the excess paint.
Again the pain will go over the eye-lids here. Don't worry about it, we'll clean that up later. Focus on making the guy look straight... or cross-eyed, however you want them to look.
Step 7. A face lift.
Now it's time to clean up the eyes.
With a number 00 brush I carefully touch up the eye lids. It can be hard to see now but you can get pretty close to the eye-ball so to speak. Here again the thinning of the paint is pretty essential. Too dry with make it lumpy, to thin might make it 'flood' the eye. It can be slightly thicker than before but it still needs to flow a little... again: trail and error. No simple trick here (even weather conditions can effect this), sorry.
I also touched up the guys eyebrows with a mix of dark brown and flesh tone. I find it works better when you keep the eyebrows subtle. You could make the eye-brows heavier then here, but always build the colour up it thin layers so that there's more flesh tone mixed in at the ends... This suggests a thinning out of the hair, so avoiding "the caterpillar effect".
Also done did the lips with a mix of the Flesh and Flat Red.
Step 8. The hood
No tricks here, just put some paint on the hood and be careful not to get paint on the face.
Step 9. Pin wash.
With all the acrylics done I hit it with a layer of glossy clear coat. And add some pin washes.
I use oils for this, thinned with odourless terpenoid. For the face (especially around the eyes, in the eye lids, the nostrils and the mouth eye use a mix of dark crimson and a lighter red I forgot the name
off sorry and some ochre. And for the edge of the hood and nose holes I mix a little black in there too.
Also did the seams on the hood, and I think that's about it.
I think the whole process took me about 30 minutes, including drying time.
So I hope this kind of clarifies how I go about it. Any questions, let me know.
Thanks for looking!
Cheers,
Martijn


