Well that's that.
After a few more oil stains and a dusting of pigments I'm declaring this team finished...
Cheers,
Martijn
Showing posts with label Camel. Show all posts
Saturday, 2 April 2016
Tuesday, 29 March 2016
New Rally Pawn and Camel... the dirt
With all the paints on, it was time for the washes.
First it was time for a general layer and then I added some pin washes...
It still needs a few more layers and detailed little washes here and there but this is what they look like now.
First it was time for a general layer and then I added some pin washes...
It still needs a few more layers and detailed little washes here and there but this is what they look like now.
Sunday, 27 March 2016
New Rally Pawn paints and decals
This guy is coming along pretty nicely. Paints and decals are on, and both he and the Camel are now ready for stains and washes...
The photos speak for them selves I think but in short it went like this.
Black primer > yellow orange base layer > red and nato black top coat > steel details > chipping using a sponge in flat black > graphite for bare metal effect > clear coat > decal > clear coat (thin).
Enjoy! Drop me a line if you want to know more.
Cheers,
Martijn
Saturday, 19 March 2016
New Rally Pawn (Camel sidekick)
As I mentioned in the last post I was going to build a little side kick for the Camel in the shape of a New Rally Pawn (I know I said Luna Pawn, but I meant New Rally Pawn)
Anyway the build is coming along pretty nicely and although I promised myself I wasn't going to do any detailing on it I couldn't resist adding some to the back as it is quite plain and well, frankly boring.
I also mixed up some of the parts. Some sprue are have parts of other versions of this same suit design and I decided to use some of them in this one. The exhaust sticking out of the back of the helmet is not supposed to be there originally. It should be a some grate and with a clear plastic cover but I usually find clear parts a pain in the bollocks, and I like this exhaust thing... so there.
Also put a little tank of some kind on the back and gave him a couple of elbow shield things.
I have to say this isn't my favourite Ma.K design, mainly because the body stops quite high above his pelvis and his ankles are really exposed.... as if his pants are hiked up really high. It looks like Urkel basically.
Anyway...
So then there the figure. I had a choice of a man and a woman's head. I went with the guy because he had better detail.
And here's my process of painting figurines' faces... I thing the steps speak for themselves. If not let me know in the comments and I'll explain further...
Now we can close the suit, add the final details and start painting it.
That's for next time.
Thanks for looking!
Anyway the build is coming along pretty nicely and although I promised myself I wasn't going to do any detailing on it I couldn't resist adding some to the back as it is quite plain and well, frankly boring.
I also mixed up some of the parts. Some sprue are have parts of other versions of this same suit design and I decided to use some of them in this one. The exhaust sticking out of the back of the helmet is not supposed to be there originally. It should be a some grate and with a clear plastic cover but I usually find clear parts a pain in the bollocks, and I like this exhaust thing... so there.
Also put a little tank of some kind on the back and gave him a couple of elbow shield things.
I have to say this isn't my favourite Ma.K design, mainly because the body stops quite high above his pelvis and his ankles are really exposed.... as if his pants are hiked up really high. It looks like Urkel basically.
Anyway...
And here's my process of painting figurines' faces... I thing the steps speak for themselves. If not let me know in the comments and I'll explain further...
Now we can close the suit, add the final details and start painting it.
That's for next time.
Thanks for looking!
Saturday, 27 February 2016
Ma.K. Camel
A while ago (somewhere in between the Undersea Pig and working on the AG Chopper) I started work on a Camel. Another kit by Hasegawa and as the name has come to suggest it was fantastic to build.
As per usual with builds involving a cockpit... I started with the cockpit. And this thing was pretty complicated. Because of its spherical shape, I had to first dry fit the whole thing... then prime it, paint it and chip it, and then assemble the whole thing.
The pilot came with a helmet... which didn't stay on very well so I added a little bevel to the connection ring to make the helmer fit better... but when I thought about is I found it didn't make enough sense to me to have the guy inside a space ship with his helmet on, especially since it didn't have a visor.
I'm get a little logical sometimes...
Anyway here he is... snug as a bug in a rug.

...on to the chipping and decals...
As of this writing the decals aren't done yet but there, because there's a ton of them. But after they're all on it's time for some washes... but before that I want to build this beast a little companion in the form of a Luna Pawn...
Thanks for looking!
As per usual with builds involving a cockpit... I started with the cockpit. And this thing was pretty complicated. Because of its spherical shape, I had to first dry fit the whole thing... then prime it, paint it and chip it, and then assemble the whole thing.
This is still a dry fit because the pilot still needed to go in, just like a bunch of hoses and wires.
The pilot came with a helmet... which didn't stay on very well so I added a little bevel to the connection ring to make the helmer fit better... but when I thought about is I found it didn't make enough sense to me to have the guy inside a space ship with his helmet on, especially since it didn't have a visor.
I'm get a little logical sometimes...
Anyway here he is... snug as a bug in a rug.

The rest of the build went of without a hitch or a mod. So it was ready for primer and paints...
My initial plan was to paint the thing a pale pink. The cockpit window was masked off and the kit had been on the shelf for some time because other projects had butted in...
So when painting got under way and this thing started getting more and more pink (I usually build up paints with really thin layers...) I suddenly remembered I hadn't seen the cockpit in quite sometime.
And when I took off the window, I suddenly realised the exterior and the interior colours really didn't work well together. So I changed course... to Mars (or the fire station)
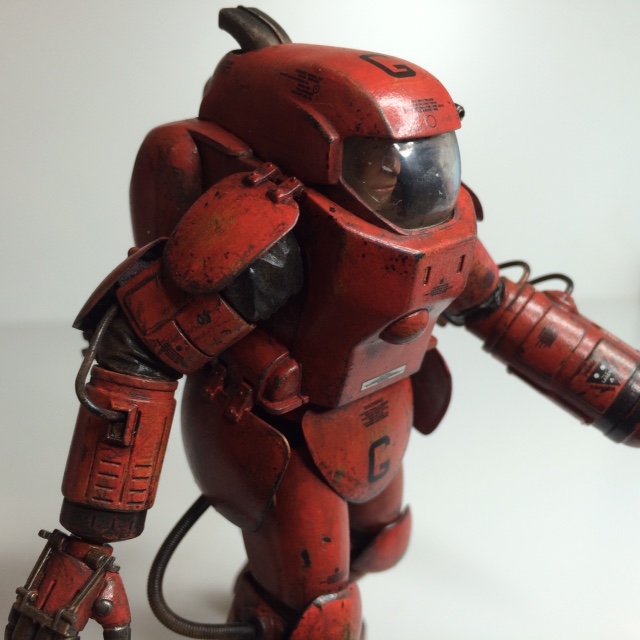
Yep another one bound for the red planet... After a thin layer of orange, I mixed up some Tamiya flat red with a little pink and orange to make for a bright warm red.
I stuck on the big letter decals at quite an early stage so I could paint over them and integrate them into the paintwork... plus the decals sheet didn't have anything in the colour I wanted.
Anyway paints done...
As of this writing the decals aren't done yet but there, because there's a ton of them. But after they're all on it's time for some washes... but before that I want to build this beast a little companion in the form of a Luna Pawn...
Thanks for looking!
Location:
Amsterdam, Netherlands
Subscribe to:
Comments (Atom)


